🌍 Good News! We Now Ship Worldwide! ✈️
No matter where you are, you can bring the magic of Fun Strokes into your home, classroom, or therapy room.
Start your pre-writing journey—from our hands to yours, across the globe! 💛 Dismiss
Looking for a festive and engaging way to build fine motor and visual skills with your little learners? My St. Patrick’s Day Freebie is packed with fun and skill-building activities that will have kids reaching, grasping, and moving while enjoying a little holiday magic!
How Does It Benefit Kids?
This exciting Leprechaun Gold Collection Activity is designed to support:
✔ In-hand manipulation – moving objects between fingers and palm
✔ Eye-hand coordination & visual tracking – following and grasping objects
✔ Left-to-right progression – a crucial skill for reading and writing
✔ Hand strength & dexterity – essential for handwriting success!
✔Web space & hand arches – Helps develop a strong, efficient pencil grasp
Ways to Play & Learn
Here are just a few ideas on how you can use this super versatile activity sheet.
💰 Gold Coin Race – Set up a challenge where kids race to fill their pot with gold while improving their visual scanning, speed, and coordination.
💰 Flick the Gold! – Use construction paper to create a simple pot. After placing the coins on the activity sheet, have kids flick, toss, or slide them into the pot! This is an excellent way to develop motor planning, precision, and finger strength.
Whether you’re a parent, teacher, or therapist, this free printable will add a touch of St. Patrick’s Day magic to your activities while reinforcing important fine motor skills.
Snag Your Freebie & Join the Fun!
Click below to download your freebie, and bring some golden fine motor fun to your St. Patty’s Day celebrations! You can snag the gold coins and pots from your local Dollar Tree!
The Fun Strokes blog is designed for educational and informational use only for teachers, therapists, and parents. It is not intended as medical advice or therapeutic treatment that would be provided in an individualized treatment plan. If you suspect a child has delays, please consult an occupational therapist.
As a pediatric occupational therapist, handwriting concerns are among the most common reasons for referrals. I often evaluate a child’s visual perceptual skills when assessing these challenges. Time and time again, I’ve noticed that difficulties with visual closure often play a significant role in their struggles.
Visual closure is one of the foundational visual perceptual skills that plays a crucial role in a child’s development, especially when it comes to handwriting and other fine motor tasks. Let’s dive into what visual closure is, why it’s important, and how it directly impacts handwriting development.
What is Visual Closure?
Visual closure is the ability to recognize an object, shape, or letter when only parts of it are visible or when it is incomplete. This skill allows us to fill in the gaps mentally and understand the whole picture, even when pieces are missing. For instance, when you see part of a stop sign obscured by a tree, your brain fills in the missing details to identify it as a stop sign. Here’s another example: if a child sees a word covered by another object, they should still be able to mentally fill in the missing parts to recognize the whole word. Visual closure is critical for children to recognize letters, words, and numbers quickly and accurately—skills essential for fluent reading and handwriting.
Why is Visual Closure Important for Handwriting Skills?
Visual closure is not just a cognitive skill—it has a direct impact on fine motor tasks, particularly handwriting. Here’s how:
Speed and Fluency in Writing: As visual closure skills develop, children become faster and more efficient at recognizing letters and numbers. This fluency reduces the cognitive load required for handwriting, freeing up mental energy for other tasks.
Recognizing and Forming Letters: When learning to write, children need to identify letters and numbers even when parts of them are not immediately obvious. For example, a child must recognize that the letter “A” is still “A” even if part of the horizontal bar is faint.
Efficient Copying Skills: Copying words or shapes from the board or a book requires recognizing incomplete forms quickly and reproducing them accurately.
Fine Motor Precision: Visual closure aids in determining where a stroke starts and stops. For example, when forming an “O,” children need to connect the starting and ending points. They may struggle with alignment, shape formation, and letter spacing without strong visual closure skills.
Signs of Weak Visual Closure Skills
Children with visual closure challenges may:
❌ Struggle to complete partially drawn shapes or letters
❌ Struggle to recognize letters or numbers when parts are missing or faint.
❌ Have difficulty copying words from the board accurately
❌ Confuse similar-looking letters (b, d, p, q)
❌ Find it challenging to close shapes properly when writing (e.g., leaving gaps in letters like “O” or “P”).
❌ Need extra time to recognize familiar words when reading
❌ Struggle with puzzles, mazes, and spot-the-difference activities
❌ Require extra time to process information visually.
How Visual Closure Supports Handwriting Development
Handwriting requires integrating multiple skills: visual perception, fine motor control, and spatial awareness, just to name a few. Visual closure is a vital component that ensures children can:
Accurately interpret handwriting models and reproduce them.
Identify errors in their own writing, such as incomplete letters or missed connections.
Develop smooth, flowing strokes that connect letters in cursive or manuscript writing.
Strengthening visual closure can significantly enhance a child’s ability to write legibly and efficiently.
Activities to Strengthen Visual Closure
Dot-to-Dot Activities: Help children connect dots to complete a picture, improving their ability to fill in missing information.
Puzzles and Tangrams: Encourage children to complete puzzles where some pieces are missing.
Complete the Letter Worksheets: Provide worksheets with partially drawn letters or numbers that children must complete.
Complete the Picture Worksheets: Provide worksheets with partially drawn images that children must complete.
Hidden Picture Games: Use resources like “Find the Difference” or “I Spy” activities.
The Research Behind Visual Closure and Handwriting Numerous studies emphasize the connection between visual perceptual skills and handwriting performance. According to a study published in The American Journal of Occupational Therapy, visual-motor integration, which includes visual closure, is a key predictor of handwriting legibility and speed (Daly, Kelley, & Krauss, 2003). Another study in Developmental Neuropsychology highlights that deficits in visual closure can lead to challenges in letter recognition and formation (Marr & Cermak, 2002).
Final Thoughts
Visual closure, one of the foundational visual perceptual skills, is a vital building block for fine motor development, reading fluency, and handwriting success. By identifying and supporting children with visual closure difficulties, parents, teachers, and therapists can help them gain confidence and achieve their full potential in handwriting and beyond.
If your child or student struggles with handwriting, consider incorporating activities and tools designed to strengthen visual perceptual skills. With practice and support, they can develop the foundation they need to succeed.
Looking for resources to support visual closure skills?
💌 As a Valentine’s Day treat, I’m also sharing a free resource: My Valentine Visual Closure Activities worksheets! These fun, skill-building activities are perfect for your little learners and pair beautifully with the tips in the blog post. Suggested use: Grades K-5
Want more tips, resources and activities to help kids thrive with fine motor skill development? Follow along for more posts, freebies and new product releases!
Daly, C. J., Kelley, G. T., & Krauss, A. (2003). Relationship between visual-motor integration and handwriting skills of children in kindergarten. The American Journal of Occupational Therapy, 57(2), 161-168.
Marr, D., & Cermak, S. (2002). Consistency of handwriting performance in elementary students with and without handwriting difficulties. Developmental Neuropsychology, 20(1), 1-12.
Schneck, C. M. (2010). Visual Perception. In J. Case-Smith & J. C. O’Brien (Eds.), Occupational Therapy for Children and Adolescents (6th ed., pp. 373-403). Mosby Elsevier.
As a pediatric OT, I’m not a huge fan of tracing, but sometimes, it’s a necessary step to help kids learn how to write. But how do you know when tracing is the right option?
Tracing is most effective when:
Other Strategies Have Been Tried: Before introducing tracing, explore alternative methods like imitation, freeform drawing and using a multi-sensory approach.
Motor Planning Needs Support: If a child struggles to sequence strokes independently, tracing can provide a helpful visual and tactile guide.
Supervised Practice is Possible: Tracing must be closely monitored to ensure the child follows the correct stroke sequence and builds effective motor patterns.
The Task Matches Developmental Level: Make sure the tracing activity is aligned with the child’s current fine motor skills and gradually increases in complexity.
Tracing becomes a viable tool for teaching handwriting while supporting proper motor planning and stroke sequencing when done carefully and intentionally.
Again, while I would never start with tracing, I will resort to this method as a form of remediation. What’s my go-to resource? Fun Strokes Trace Shapes! Why? It uses the same images as the magnets as part of my comprehensive pre-writing program.
🌟 Consistency is Key with the Fun Strokes Pre-writing Kit: Trace Shapes! 🌟
One of the standout features of the Fun Strokes Pre-writing Kit: Trace Shapes is how it mirrors the same images as the beloved Fun Strokes Pre-writing Magnets. This intentional design creates a seamless learning experience, ensuring kids develop foundational pre-writing skills with consistency and confidence. Fun Strokes-Trace Shapes allows you to scaffold pre-writing practice, gradually increasing the challenge by introducing or re-introducing Fun Strokes Magnets once the child can trace each shape. This will bridge the gap, making transitioning from tracing to imitating (mimicking an adult) easier.
Why does this matter?
✔️ Reinforces Skill Retention
By using the same familiar images across both tools, children can easily connect what they’ve learned when tracing to their magnet practice. This consistency helps solidify their understanding of pre-writing strokes and makes skill carryover more effective.
💡 Why It Works:
Builds Confidence: Seeing the same images while practicing strokes gives kids a sense of familiarity and achievement. They know what to do because they’ve already had success when tracing, bridging the gap to imitation, then copying, and finally independence.
Promotes Muscle Memory: Repetition is the key to mastery! By practicing the same shapes and strokes in different formats— traceable cards and magnets —children strengthen their motor planning and fine motor control, paving the way for handwriting success.
Supports a Multi-Sensory Approach: Combine Trace Shapes Pre-writing Kit with the magnets to offer a dynamic pairing that creates a comprehensive learning experience that engages multiple senses and helps children effectively transfer their skills across different settings. Check out the Fun Strokes Pre-writing Kit Bundle for more multi-sensory options!
Ensures proper motor planning and sequence for successful and proficient handwriting progression.
Fun, Engaging, and Effective: From playful images to purposeful design, Fun Strokes Pre-writing Kit: Trace Shapes ensures kids stay engaged while building the strong foundation they need to succeed in handwriting.
✔️ Simple, No-Fuss Prep: Print, laminate, and you’re ready to go! Attach the cards to a key ring or store them in a photo box for easy, grab-and-go use. ✔️ Engaging Visual Prompts: Familiar and fun images help kids conceptualize the motor plan for pre-writing shapes. ✔️ Durable & Reusable: Simply laminate the cards so they will withstand repeated practice, saving time and money. ✔️ Use Solo or Paired: These cards work great on their own or paired with Fun Strokes Pre-writing Magnets for a multi-sensory learning experience.
💡 Why It Works:
Promotes confidence and independence while kids are offered a little boost to help them master basic strokes and shapes.
Ensures proper motor planning and sequence for successful and proficient handwriting progression.
🔗 Ready to bridge the gap and get your little learner well on their way to pre-writing success? Add Fun Strokes Pre-writing Kit-Trace Shapesto your toolkit and watch your little learners thrive!
Teaching children how to write is an exciting milestone, but not without challenges. Many parents and educators turn to tracing as a go-to method for teaching kids how to form letters and shapes. However, while tracing may seem straightforward and effective, it can sometimes do more harm than good—especially for children with poor visual motor skills.
Here’s why you should approach tracing with caution and consider alternative strategies for teaching handwriting.
The Pitfalls of Tracing
1. Reduced Carryover of Formations Tracing often fails to help children internalize how to form letters and shapes independently. Instead of building the muscle memory needed for confident handwriting, kids may become overly dependent on trace lines. Without the guide of the tracing template, they may struggle to replicate the shapes or letters they practiced.
Even worse, children who aren’t adequately supervised during tracing activities can develop incorrect habits. For example, they might form letters or numbers with the wrong stroke sequence, making it harder to unlearn these patterns later.
2. A Missed Opportunity for Active Learning Children learn best by actively engaging in the process of writing. Watching an adult demonstrate the correct way to form letters and shapes helps them build a solid foundation. Demonstrations provide children with the visual and motor guidance to replicate these movements and create muscle memory.
Tracing, on the other hand, is often a passive activity. While it might keep kids busy, it doesn’t promote the same level of cognitive engagement or skill development as imitation and hands-on practice.
The Better Alternative: Active, Multi-Sensory Learning
If tracing isn’t the best method for teaching handwriting, what should you do instead? Here are some practical tips to make handwriting practice more effective and enjoyable:
1. Ensure Kids Are Developmentally Ready Before introducing letter formation, make sure children can complete basic pre-writing strokes, such as vertical, horizontal, and diagonal lines and circles. These foundational skills are critical for successful handwriting, and writing readiness activities for preschoolers can help build these skills. Explore Fun Strokes, a comprehensive pre-writing program that prepares children for kindergarten and beyond.
2. Model First Show children how to form letters and shapes by demonstrating the proper technique. Let them observe the correct stroke order and direction before asking them to imitate it. This step ensures they learn the correct motor plan from the start, which is essential for handwriting success.
3. Use Multi-Sensory Techniques Children thrive when learning is hands-on and fun. Incorporate activities that engage their senses and make writing practice more interactive:
Vertical surfaces: Writing on a vertical surface, such as a whiteboard, strengthens shoulder and arm muscles.
Fun strokes: Use tools like pre-writing magnets to teach essential strokes and movements.
Sensory writing: Try finger-painting letters, drawing shapes in sand, or forming letters with clay. Multi-sensory handwriting strategies like these make learning enjoyable while improving fine motor skills.
Multi-Sensory Writing
4. Practice Regularly Consistent practice is key to building strong handwriting skills. Short, frequent sessions are more effective than long, occasional ones. Make sure to reinforce the correct motor plan during each practice. Handwriting improvement comes from repetition and consistency.
Build Confident, Independent Writers
The ultimate goal of handwriting practice is to help children become confident, independent writers who can form letters and shapes with ease. While tracing may have its place in specific scenarios, it’s important not to rely on it as the primary teaching method.
Instead, focus on strategies that encourage active learning, proper technique, and multi-sensory engagement. By taking the time to teach handwriting correctly from the start, you’ll set your child up for lifelong success in writing and beyond.
Take Action for Better Handwriting Skills
Ready to help your little learner master handwriting? Start with these simple yet effective strategies:
starting with pre-writing strokes
modeling proper techniques
engaging multi-sensory activities
ensuring consistent practice
Avoid relying too heavily on tracing, and instead, encourage active learning to foster confidence and independence.
Watch your little learner’s handwriting skills flourish with these proven methods! 🌟✏️
In the world of pediatric occupational therapy, finding the right tools to support pre-writing skills is crucial. Did you know that kids should master nine pre-writing strokes before starting to learn how to write letters?
The 9 Pre-Writing Strokes include: |, —, O, +, /, square, \, X, and Δ.
Fun Strokes is an engaging pre-writing program that uses magnets and worksheets to make learning pre-writing strokes fun! You can always find the Fun Strokes magnets in my Occupational Therapy bag. It’s a wonderful curriculum for pre-K teachers, special education teachers, or early elementary teachers who would like to teach pre-writing strokes and shapes.
Fun Strokes Pre-writing Magnets
The Fun Strokes Program includes 11 durable magnets. This no-prep resource is perfect for pediatric occupational therapists who are on the go between schools or treatment rooms at a clinic.
The magnets hold up session after session, making them a wonderful addition to any occupational therapy treatment room or clinic. This durability ensures that therapists have a reliable tool that can be used repeatedly without any prep work.
The Fun Strokes Program allows you to grade up or grade down the pre-writing activity during your treatment session, creating the just-right challenge for your student. Using this program, I have watched so many of my students’ pre-writing skills blossom, and they are more confident with writing tools!
Car magnet used to work on circles.
One way I use the Fun Strokes Program is to place the magnets on a vertical surface, which helps develop wrist extension, grip strength, and shoulder strength—key components for successful handwriting and overall strength.
When children engage in activities on a vertical surface, such as a whiteboard or easel, their wrists naturally extend, which promotes the development of proper wrist positioning needed for an efficient pencil grip. This positioning helps strengthen the small muscles of the hand, improving grip strength and control. Additionally, vertical surface work requires the activation of the shoulder girdle muscles to stabilize the arm, fostering greater shoulder strength and endurance.
Flower magnet used to work on vertical lines
Here are a few additional fun ideas for using Fun Strokes magnets to build pre-writing skills:
Try incorporating tongs and small manipulatives, like pom-poms or beads, to place onto each magnet. This will encourage the development of a tripod grasp while reinforcing pre-writing strokes.
Another creative idea is to use a baking pan, shaving cream, and finger paint to trace or draw missing pre-writing strokes onto each magnet, adding a sensory element that engages both tactile and visual senses. This multisensory approach not only makes learning fun but also helps reinforce memory and motor planning as children practice forming each stroke in new, exciting ways.
Car magnet placed on a cookie sheet while using shaving cream to draw circles.
Fun Strokes is more than just a pre-writing program; it’s a comprehensive program that builds foundational skills for writing through engaging, hands-on activities. By incorporating magnets, worksheets, and vertical surface practice, this program offers a unique and effective way to develop fine motor skills, visual-motor integration, postural control, and much more. Whether you’re a parent, teacher, or occupational therapist, Fun Strokes can be a valuable addition to your toolkit, providing children with the skills and confidence they need to become successful writers, all while having fun learning new skills!
Stephanie Butler
My name is Stephanie, and I am a pediatric occupational therapist with over a decade of experience in outpatient clinic settings, early intervention, and the school system. I am the creator of The Organized Occupational Therapist. I enjoy sharing time-saving organizational hacks and treatment ideas. I have a store on TpT, The Organized Occupational Therapist, where I am passionate about creating engaging digital download resources with the busy pediatric occupational therapist in mind.
Therapists, educators, and parents! Are you looking for spooky, fun ways to build fine motor skills with a Halloween twist? But wait, you don’t want to break the bank to do so, right? I’m here for you! In my Frugal OT series, I share all sorts of fine motor skill-building activities using supplies from my favorite go-to, Dollar Tree! You can do these activities with kids during therapy sessions, classroom centers, or at home. So, let’s get to it! Here are my top three picks for some Halloween-themed fun!
#1 Eyeball Spoon Challenge
Dollar Tree Supplies Needed: eyeballs, skeleton hands, and a bucket to hold the witch’s brew.
Supplies Needed
The kids work their spooky magic to dunk eyeballs into the witch’s bubbling brew! 🧙🔮👁
This activity is a play on spoon racing, but having the kids race each other is totally optional. Seeing how many eyeballs they can get into the bucket is just as fun!
While the kids enjoyed adding the essential ingredient to the witch’s brew, I was targeting:
🧙Fine Motor Control: Picking up the eyeballs and carrying them across the room requires precision and control when maneuvering, holding, and stabilizing the spoon.
🧙 Hand-eye coordination: Walking with a spoon while balancing an object challenges hand-eye coordination. The kids must focus on the spoon’s position and adjust it in real time to prevent the eyeball from falling.
🧙Balance and Control: This activity encourages balance and control as children strive to keep the spoon steady and level to prevent the eyeball from tipping off. This is also a great way to strengthen hand and wrist muscles.
🧙Gross Motor Skills: While the primary focus is on fine motor skills, this activity also requires coordination of the larger muscle groups.
🧙Spatial Awareness: This activity helps kids understand the space around them. They must stay within a designated path to get to the witch’s brew, enhancing their spatial awareness and perceptual motor skills.
How To Offer the “Just Right” Challenge:
It’s so easy to grade this task up (make harder) or down (make easier). Here’s how. It’s all about the spoon used to transfer the eyeballs. The deeper the bowl, the easier it is. That’s it!
See it in action:)
Eyeball Spoon Challenge
#2 “Bony” Awareness
Targeting Body Awareness Skills!
Dollar Tree Supplies Needed: Skeleton, that’s it! Easy Peasy!
This is a super cute way to address body awareness during the Halloween season. Simply stated, body awareness is knowing your body’s position in space, both at rest and when moving. There are four components:
🦴Being able to name individual body parts
🦴Being able to discriminate between the left and right sides of the body
🦴Understanding movement
🦴Being aware of how your body is moving in space
Body awareness is an essential skill that is needed for just about everything that we do.
This skeleton from Dollar Tree worked perfectly to address this skill in a spooky, fun way. The kids were asked to mimic the “bony” position of the skeleton. They also had fun positioning the skeleton themselves and then trying to mimic it. For those needing more support, I had them try it in front of the mirror so they could see what their body was doing🎃.
See it in action:)
Targeting “Bony” Awareness
#3 Help the Mummy Get To The Haunted Forest
Dollar Tree Supplies Needed: mummy hopping toy, haunted forest sign (optional).
When I saw this super cute wind-up toy at my local Dollar Tree, my eyes lit up! I haven’t seen these around in a while, but I remember being fascinated by these mobile wonders when I was a kid! Wind-up toys are so much fun, and they are a great way to address fine motor skills! Here, the kids were charged with getting the mummy ALL THE WAY down “Spooky Street” to the “Haunted Forest.” This encouraged them to wind, wind, and wind so the mummy could go the entire distance. Winding the little knob on the side of the toy can be quite difficult for little hands, but they were so motivated they pushed through!
This activity may look simple, but the kids are actually working on a ton of skills!
Spooky Skills addressed:
👻Builds Asymmetrical Bilateral Coordination: both hands are working together but doing different tasks; one hand is leading by winding up the mummy while the other is helping by holding the mummy in place.
👻Builds Grasping Skills & Hand Separation: the little knob is so tiny it’s just about impossible to use five or even four fingers, so it facilitates hand separation and a functional tripod grasp.
👻BuildsFinger Strength: It takes a bit of muscle 💪🏽 to wind up the toy. This is not recommended for very young kiddos. This activity will probably work best for kids in grades K and up.
👻Builds Motor Planning Skills: Figuring out how to manipulate the toy and place it on the table requires kids to plan and sequence the motor steps. In my Instagram reel, you may notice some unusual movements, or what we therapists call compensatory movements. But that’s okay! The kids were motivated to do it again and again, allowing for a lot of practice time to get it right.
👻BuildsHand-Eye Coordination: Placing the mummy on the path requires kids to scan the area visually then use their hands to place the mummy on the target. As kids watch the wind-up toy move, they use their eyes to track its path.
👻Builds Problem-Solving Skills: If the mummy didn’t quite make it to the “Haunted Forest”, the kids had to figure out what to do differently next time. This critical thinking aspect contributes to their cognitive development.
👻Builds Executive Functioning Skills: Wind-up toys help kids with executive functioning difficulties because they require focus and patience. Kids need to wind them up before seeing the toy’s movement. This fosters concentration and delayed gratification, which is essential for impulse control, planning, and sequencing.
👻Sparks Imagination: Pretend play is a great way to get kids’ creative juices flowing. The kids loved helping the mummy get to the “Haunted Forest.” Take it further by prompting them with questions like: “What will the mummy do when he gets there? Do you think there will be other mummies in the forest? Who else do you think will be in the forest?
Boy, does this activity pack a punch! So head to your local Dollar Tree and snag your wind-up toy soon! By the way, the “Haunted Forest “ sign is also from Dollar Tree!
The Fun Strokes blog is designed for educational and informational use only for teachers, therapists, and parents. It is not intended as medical advice or therapeutic treatment that would be provided in an individualized treatment plan. If you suspect a child has delays, please consult an occupational therapist.
Handwriting can be difficult for children with fine motor and sensory processing difficulties. For this reason, it may soon become a non-preferred activity. This makes it really tough to get kids to engage in handwriting tasks without seeing undesirable behaviors like whining, defiance, or avoidance altogether. One of the best ways to remedy this problem is to make it fun! A great way to make handwriting fun is by turning it into a game.
Kids love to play games. Make handwriting a game by using foam dice from the Dollar Tree. I love these dice because they are so versatile. The sides have a laminated surface that allows you to customize them as you’d like. Use a dry-erase marker to write commands on each side of the die. Each command corresponds to the skill the child or children need to work on. For example, letter placement skills or where to place letters on the line. “4 tall letters, 5 short letters, 3 “diver” or go under letters, etc. The kids are asked to roll the die and write whatever it lands on. You can make it simple or more challenging based on the level the child or children are at. Perfect for doing during therapy sessions, as a class, or at home. All the supplies can be gathered for pennies on the dollar at your local Dollar Tree.
Skills Addressed:
visual tracking and scanning
orientation (making sure letters are facing the correct direction on the dice)
eye-hand coordination
proprioception/grading force (mainly when tossing the dice)
left to right progression
targeted handwriting legibility components
turn taking
executive functioning skills (waiting/impulse control, remembering multi-step directions, initiating and following through with the task
Dollar Tree Supplies Needed:
foam dice
Staples Needed:
dry erase markers/pencils
paper of your choice (dependent on the child’s skill level)
plastic sleeve (if using dry erase markers)
Supplies Needed
Instructions:
Decide which component of handwriting legibility you’d like to address, e.g., letter formation, letter placement/line orientation, reversals, etc. If letter formation, write letters on the dice. If the child needs to work on specific letters, write those letters on the dice, e.g., “magic c” letters/letters that begin with “c .”If letter placement, write the type of letter on the dice and add a number to represent how many.
Set up the game with the materials needed, dice, markers or pencils, and paper.
Where did I find the paper and dry-erase sleeve used during this activity? Here are the links:
Smart Start K-1 Writing Paper
Clear Plastic Dry Erase Sleeves
Disclosure: As an Amazon Associate, I earn from qualifying purchases.
How To Offer the “Just Right” Challenge:
It’s so easy to grade this task up or down. Here’s how:
Grade Down (Make it Easier)
Provide a model of the alphabet.
Have the child trace the letter first, then try to copy it.
use blank paper versus lined paper to allow for larger letters
If the child needs more movement to stay engaged, have the child write on an easel instead of paper.
Grade Up (Make it Harder)
Write these commands on the dice:
Write a 3 letter word
Write a word containing a short letter.
Write a word containing a “diver”/go under letter.
write a capital letter
write a lowercase letter
Write a certain number of sentences
You really can customize this game in so many ways, be creative!
Time To Play!
Time To Play!
As always, have fun!
Disclaimer:
The Fun Strokes blog is designed for educational and informational use only for teachers, therapists, and parents. It is not intended as medical advice or therapeutic treatment that would be provided in an individualized treatment plan. If you suspect a child has delays, please consult an occupational therapist.
The 54321 grounding technique is a tool children can use when feeling anxious, stressed, and overwhelmed. This technique can help to prevent multiple anxious thoughts from piling up by focusing on your surroundings in the present moment. It calls for you to tap into a heightened awareness of your environment, fully taking in your five senses and grounding your thoughts to the present moment. The 54321 grounding technique can be used to regulate emotions and calm down. It is a great strategy to teach when helping kids self-regulate.
How To Use The 54321 Grounding Technique:
Before starting, take several deep breaths to start the calming process. Then follow these steps:
Look around, and name five things you can see. This could be anything that you see in your surroundings.
Name four things you can touch. For example, your shirt, a pencil, a paperclip, or perhaps your hair.
Tune in and name three things you can hear. For example, someone talking, audio from a computer or phone, someone walking, your breath.
Find two things you can smell. This might be hard to do, but not impossible. Maybe use a little hand sanitizer and take in how it smells. Or maybe put on some lip balm and pay attention to its scent. Maybe smell your hair, and take in the scent of your shampoo or hair products. Is there a book nearby? Take in the smell of its pages. Are you outside? Take in the refreshing scent of fresh air.
Finally, focus on something you can taste. If you have a mint or piece of gum handy, place it in your mouth and take in its flavor. Take a sip of a drink. Don’t have access to anything? Simply focus on the taste in your mouth. Sometimes the taste of your minty toothpaste, or mouthwash still lingers from your morning routine. Or perhaps you just finished a meal. Can you still taste the tomato in the sauce you ate? Can’t taste anything? Think of the taste of your favorite food.
It Is Important To Note:
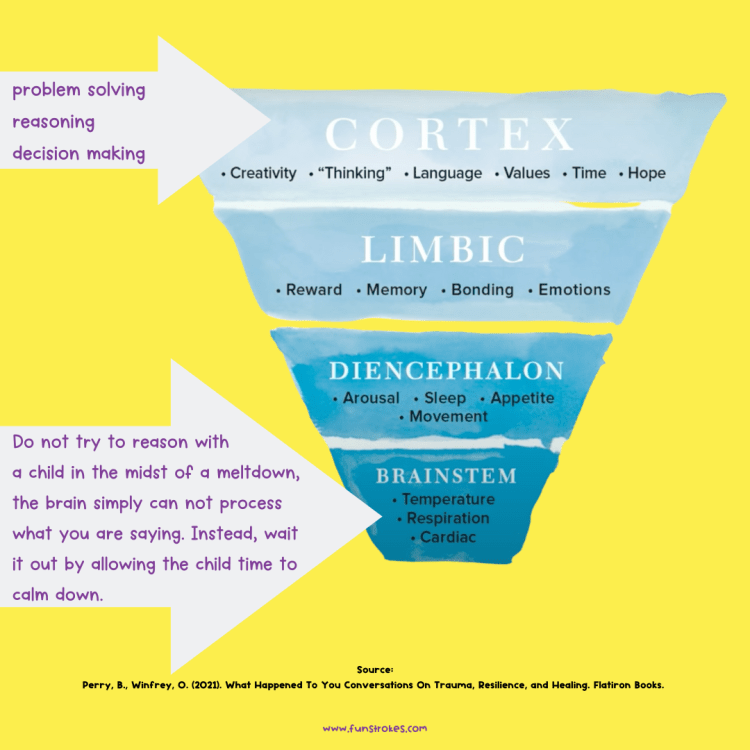
Never try to reason with a child or ask a child to carry out a previously learned strategy in the midst of a meltdown. Instead, equip them with coping strategies before the child reaches an escalated state and loses control of their behavior. Once amid a meltdown, the brain simply can not process what you are saying or asking the child to do. At this point, it is too late. Why? Because the part of the brain responsible for reasoning, problem-solving, and decision-making is the cortex or the highest level of brain function. Whatever you are trying to communicate to the child only reaches the brainstem or the lowest level of brain function. When a child is dysregulated, as seen by kicking and screaming, yelling, throwing things, etc., all you can do is wait it out. You must give the child space and allow them to eventually calm down before asking anything of them. At that moment, all you can do is make sure the child is safe and that others around them are also safe.
Fun Strokes Freebie:)
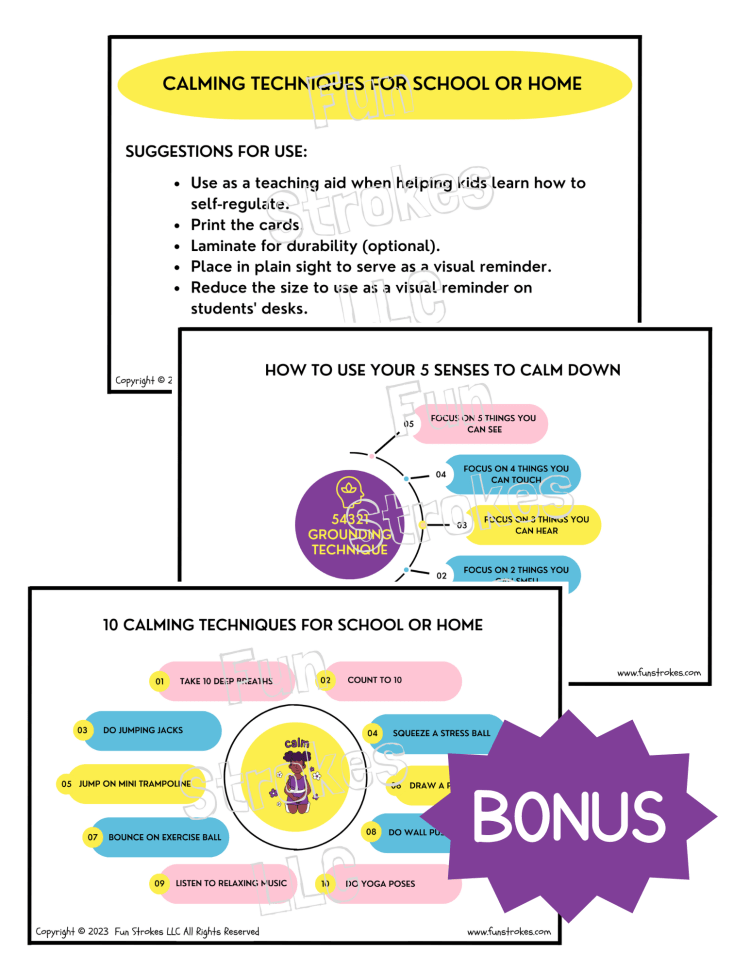
Would you like to use this technique with your littles? Here is a handy 6 x 4 in. card (PDF) that you can print and use as a teaching aid when helping kids learn how to self-regulate. Suggestions for use:
Print the card.
Laminate for durability (optional).
Place in plain sight to serve as a visual reminder.
Reduce the size to use as a visual reminder on students’ desks.
Bonus Card Included: 10 CALMING TECHNIQUES FOR SCHOOL OR HOME
Perry, B., Winfrey, O. (2021). What Happened To You Conversations On Trauma, Resilience, and Healing. Flatiron Books.
Disclaimer
The Fun Strokes blog is designed for educational and informational use only for teachers, therapists, and parents. It is not intended as medical advice or therapeutic treatment that would be provided in an individualized treatment plan. If you suspect a child has delays, please consult an occupational therapist.
Have kids on your caseload who need to work on scissor skills? Chances are you do. Have a heavy caseload with very little prep time? Chances are you do. Do you find it challenging to set goals that are measurable and easy to take data on? You are not alone! Save loads of time using this resource! Whether you are completing a formal assessment, an IEP annual review, or working with a child to improve their scissor skills, this guide is equipped with all the tools you need to make the process seamless and easy! I Can Use Scissors! boasts clear and concise graphics, making it easy to find information at a glance. The guide includes everything you need from assessment to goal writing, to intervention and data collection. All materials correspond to the developmental progression of scissor skills making the process straightforward and efficient.
How Does It Work?
#1 Use The Handy Scissor Skill Developmental Checklist To Quickly Gauge Where The Child Falls On The Developmental Timeline
The Scissor Skill Developmental Checklist is helpful when determining if a child’s skills are developmentally appropriate. The checklist allows you to easily determine age-based expectations at a glance. Once you’ve identified developmental expectations, conveniently prep the materials needed for your assessment by grabbing one of the corresponding worksheets. Present the child with an age-appropriate cutting task and see how they perform. Select the appropriate worksheet to grade the task up or down based on the child’s capability. Use the checklist to document the date and where the child falls on the developmental timeline. Continue to use the checklist as you work with the child. Check the boxes and record the date as the child’s scissor skills progress.
Scissor Skill Developmental Checklist
#2 Use The Handy Scissor Skill Checklist To Assess The Quality Of The Child’s Scissor Use
Use the handy Scissor Skill Checklist: Skills Needed For Efficient Scissor Use to guide your clinical observation. This easy-to-use graphic outlines the underlying skills needed for efficient scissor use. Check the boxes as you observe the child complete the cutting task. For example, if the child is able to sit upright, unsupported with good posture, place a check in the box under “balance”. If you see that the child is able to hold both hands steady at midline while cutting, check the box for “shoulder stability”. The checklist allows you to quickly identify the skills that are intact while also clearly illustrating any skills the child may be deficient in. If any boxes remain unchecked once you’ve completed your clinical observation, you can swiftly determine what the child needs to work on. Continue to use the graphic as you work with the child. Check the boxes and record the date as the child’s scissor skills progress.
Scissor Skill Checklist: Skills Needed For Efficient Scissor Use
Good Scissor Skills Look Like…
When a child is using scissors efficiently, you will observe the following behaviors:
sitting upright with good balance
working at midline (both hands held at the middle of their torso)
holding the paper and scissors steadily
relaxed shoulders, not shrugged
elbows down, not raised
wrists held in a neutral position, not flexed (bent) or extended (raised)
holding and rotating the paper using their “helper hand”
functional “thumbs up” grasp
opening and closing scissors (opposition skills)
coordinating eye-hand movements to stay on the lines
smooth cuts versus choppy cuts
being safe
focused, eyes on the task
Good Scissor Skills Look Like…
#3 Use The Corresponding Goal Bank To Set Goals
Data, data, data! You’ve got to have it these days, but it’s not always easy to get…until now!
Easily set measurable goals using the Scissor Skill Goal Bank. The goal bank contains a template of 11 goals that correspond to the Developmental Progression of Scissor Skills Checklist. Customize each goal using the modifiers provided to fill in the blanks. Continue to use the goal bank to set new goals as the child progresses. Data tracking is super easy when using worksheets that match the goals and developmental criteria. No more searching for appropriate activities or work samples to support your goals and data collection. The Data Tracker provides a template to record the child’s progress toward goals. There’s your data, just like that. Easy-peasy!
#4 Use The Corresponding Worksheets To Address The Child’s Goals
The I Can Use Scissors! Workbook includes over 70 pages of worksheets that correspond to the Scissor Skill Developmental Checklist as well as the Scissor Skill Goal Bank (both included with purchase). The worksheets start at the beginning with snipping skills and progress to cutting out complex shapes. The borders of the design are measured to accommodate the level of precision the child should be able to cut. For example, if the child is 3 years old, he or she should be able to remain within ½” borders. You don’t have to guess or eyeball it when using these worksheets.
Skills are addressed in developmental order:
Snipping
Lines
Simple Shapes
Curvy Lines
Complex Shapes-Dotted Lines
Complex Shapes-Solid Lines
The worksheets contain fun and engaging graphics to spark the child’s interest. The worksheets were created using a task analysis approach. They provide a graded support system with levels of visual prompts that can be faded as the child progresses. The prompts illustrate “helper hand” placement (for lefties and righties), when to rotate the paper, how to get from the edge of the paper to the design, and finally where to cut on the line. The worksheets allow you to provide the “just right challenge” which is important for meaningful engagement in the task. I Can Use Scissors! Workbook is available in color or black and white.
Coloring Excitement🖍: The black-and-white version of the workbook offers coloring opportunities that will further build eye-hand coordination and fine motor control while unleashing a child’s creativity!
#5 Use The Handy Data Trackers to Collect Data
The worksheets contained in the guide align with the Scissor Skill Developmental Checklist as well as the Scissor Skill Goal Bank. This makes it so easy to take data and determine whether or not the child has met the criteria to document mastery of the goal. The worksheets start at the beginning with snipping skills and progress to cutting out complex shapes. The borders of the design are measured to accommodate the level of precision the child should be able to cut. For example, if the child is 3 years old, he or she should be able to remain within ½” borders. You don’t have to guess or eyeball it when using these worksheets. The Data Trackers provide a template to record the child’s progress toward goals.
Data Tracker
I Can Use Scissors! covers all the bases, you simply will not need any other resource! So what are you waiting for? Make your job easier by grabbing this digital resource today!
The Fun Strokes blog is designed for educational and informational use only for teachers, therapists, and parents. It is not intended as medical advice or therapeutic treatment that would be provided in an individualized treatment plan. If you suspect a child has delays, please consult an occupational therapist.
Scissor skills are essential in both school and life. Solid scissor skills will help children as they learn and play. The maturation of scissor skills requires lots of practice over time. As with all fine motor skills, there is a developmental progression to acquiring scissor skills. Check out my post Scissor Skill Development...What To Expect to read more about this. Some children have trouble with learning how to use scissors, and there can be many reasons why. Using scissors efficiently is a very complex skill that requires many prerequisites. To read more about this check out my post Good Scissor Skills…What Does It Take?In this post, I will focus on how to help kids who struggle with learning how to use scissors. Here are 12 strategies that can help!
#1 Make Sure The Child Has The Prerequisite Skills
Engage the child in activities that will build the underlying skills needed for scissor use. Here are some activities that get little hands ready for cutting with scissors:
string beads onto a pipe cleaner or string
lacing activities
tear paper
crumble paper; make it a game by tossing the balls into a basket.
play “Rock, Paper, Scissors”
use plastic safety scissors to cut play dough, modeling clay
use tools like tongs and tweezers to pick up small objects
have the child place a rubber band around his or her fingers and practice opening and closing his or her fingers
play with hand puppets or make brown paper bag puppets to allow the child to work on opposition skills while opening and closing the puppet’s mouth
9 Activities To Get Little Hands Ready For Scissor Use
Here’s a handy infographic that outlines activities that can be done to prepare kids for learning how to use scissors. This is an excellent resource to share with teachers, parents, and caregivers of young children. Click the button below to get this free PDF emailed to your inbox today!
Be sure to equip children with the correct type of scissors. There are two types of scissors, left-handed scissors, and right-handed scissors. If the child is using right-handed scissors to cut using their left hand, the blade may obstruct their view of the line while they are cutting. Children who are left-handed but have been ill-equipped with right-handed scissors may have trouble learning to use scissors efficiently. You may notice these kiddos holding their heads in awkward positions as they try to see around the scissor blade. Also, teach lefties to cut to the left of the design and in a clockwise direction. This will help them see the line they are cutting and allow them to rotate the paper efficiently with their right hand.
Scissors: Lefties vs. Righties
Therapist Choice: Left-Handed Scissors from Amazon
Disclosure: As an Amazon Associate I earn from qualifying purchases.
#3 Set Up For Success
Make sure the child is set up for success by ensuring that he or she is sitting down with both feet supported on the floor or foot rest. Sitting with both feet planted on the floor provides a stable base to work from. This will help stabilize the core allowing the child to focus their energy on what their hands are doing. It will also improve body awareness or a better sense of where their body is moving in space. When the child is sitting upright, with both feet planted on the floor, he or she is ready to cut.
#4 Follow Developmental Guidelines
Be sure to follow the developmental progression of skills indicated in my post Scissor Skill Development…What To Expect. Start with snipping, followed by cutting across paper, then lines, then simple shapes. Once the child can cut out simple shapes well, he or she may advance to complex shapes.
#5 Thumbs Up! Ensure Correct Grasp and Positioning
Look at the way the child is holding the scissors. The thumb should be held up, pointing toward the ceiling, like a hitchhiker. For the most efficient approach, encourage a thumbs-up grasp on both hands while cutting with scissors. Most scissors have a little hole and a larger hole. Teach children that scissors are right side up when the thumb is in the little hole.
Ways to facilitate a thumbs-up grasp:
How to Facilitate A Thumbs Up Grasp
Thumbs Up Hack
Tape the paper to the edge of the table. Have the child sit on the floor in front of the table. Have the child snip along the border of the paper or cut up towards the top of the paper. If the child is ready, draw lines on the paper (see image/video above).
Place stickers on the child’s thumbs. Explain that they must be able to see the stickers while cutting. If they are unable to see the stickers, they must move their hand so that they can.
Paste googly eyes and a pom pom nose on the scissors so kids can easily see and know that the scissors are right side up (see video below).
Thumbs Up Hack
#6 Start With Rigid Paper Because It’s Easier To Manage
Use cardstock or stiff paper that holds its place by nature. It’s easier to cut paper that isn’t flimsy or floppy. Some suggestions are:
paint color samples (the natural lines in between the colors are great for beginners)
old or discarded playing cards
magazine ad inserts
old or discarded folders
As the child’s skills progress, introduce paper that is less firm, such as construction paper. Keep in mind, that the flimsier the paper the more skill is required to cut it without tearing the paper.
#7 Widen The Lines or Borders
Use a sharpie to bold or thicken the lines around the borders of the design. Or use a highlighter to make the borders of the design stand out. This will help with visual attention and focus on the line.
#8 Make it Smaller
Present the child with smaller pieces that are easier to manipulate. For example, quarter an 8.5″ x 11” piece of paper. Draw lines or simple shapes for the child to cut on each piece.
#9 Help Them Get There!
For kids who struggle with finding their way to the shape or design, highlight a path to get them there. You can simply draw a line from the edge of the paper to the design. Here is an example taken from my scissor skills workbook I Can Use Scissors! The Ultimate Guide To Scissor Skill Development & Workbook which is available for purchase at the Fun Strokes Store.
I Can Use Scissors!: The Ultimate Guide To Scissor Skill Development& Workbook
#10 Use Adapted Scissors
There are many different types of adapted scissors designed to meet the specific needs of students. Here are some examples of the types I like to use:
SPRING SCISSORS
LOOP SCISSORS
PUSH DOWNTABLETOP SCISSORS
TABLETOP SCISSORS (MOUNTED)
MAILING SUPPLIES CUTTER/GIFT WRAP CUTTER
Types of Adaptive ScissorsSpring Scissors From Dollar Treemailing supplies cutter
A great way to provide access and increase the level of participation for kids who need a lot of assistance with cutting is by using a mailing supplies cutter. This is a safe way to provide hands-on engagement in scissor activities. This adaptation is ideal for those kiddos who have significant motor limitations and therefore need a higher level of assistance or adaptations, for example, children with cerebral palsy. If necessary, you can also place the mailing supplies cutter in a universal cuff to enable the child to hold it.
Adapting A Cutting Task Using a Mailing Supplies Cutter
Classroom Teachers: Consult with your school’s OT for a recommendation regarding which type of scissors may benefit your student or students.
Therapist Choice: Mailing Supplies or Gift Wrap Cutters from Amazon
Disclosure: As an Amazon Associate I earn from qualifying purchases.
#11 Ensure Correct Positioning Of The Wrist, Elbow, and Shoulder.
Is the child using their whole arm versus their hands? Place a folder, magazine, or bean bag under the arm of the dominant hand while cutting to facilitate correct positioning (see video below).
Positioning Hack
#12 Look For Physical Clues
Behaviors that indicate immature development of the shoulder and elbow when cutting with scissors:
holding and using scissors with the wrong side up
shoulders shrugged
raising the elbow away from the body instead of relaxed next to the body
sticking tongue out while cutting
cutting to the side instead of forward while holding the paper at their midline
Shoulders shrugged, raised elbows, and flexed wrists are all compensatory movements that children make when they lack adequate strength and stability in their upper body (core and/or shoulder girdle). The wrist should be held in a neutral position (not bent or extended up) with the elbow resting next to the body. The shoulder should be in a natural position, not shrugged or elevated. Observing a child stick out their tongue while cutting or writing may be an indicator that the palmar reflex isn’t fully integrated. Consult with an occupational therapist if you have concerns about your student’s or child’s scissor skills.
Whew! There ya go, 12 ways to improve scissor skills! But before I finish, there’s one more issue I’d like to tackle.
BONUS TIP: Some kids always seem to manage to lose some of what they’ve cut out during the cutting process. So when they are attempting to assemble the craft or worksheet, something is missing! This may be due to visual perceptual challenges and/or difficulties with executive functioning skills and organization. This strategy works great for both scenarios. A quick fix is to place two small baskets on their work surface. Labeled one “keep” and the other “trash”. As the child is working, have them place the pieces they need in the “keep” basket. The materials that should be discarded go in the “trash” basket. Here’s a video that illustrates how to modify a cutting task, including the use of a “keep” and “trash” basket.
How To Modify a Cutting Activity
Do you have a go-to strategy that you’d like to share? Have a question or comment? Please leave a reply in the box below.
Thanks for stopping by, please come again!
Disclaimer:
The Fun Strokes blog is designed for educational and informational use only for teachers, therapists, and parents. It is not intended as medical advice or therapeutic treatment that would be provided in an individualized treatment plan. If you suspect a child has delays, please consult an occupational therapist.